spotipi™: Spotify Connect on a Raspberry Pi

Update 2019/12/31: Incorporated some fixes for Raspbian Buster.
With all the “new” developments in home audio, our stereo Hi-Fi set looks quite dated. However, it is hard to beat in sound quality and value for money. Because it’s equipment from the mid-90s it obviously lacks a lot of convenience; flipping records and changing CD’s does get old.
To streamline this I’ve been looking at streaming solutions using a Raspberry Pi. The easiest solution is to use Bluetooth A2DP to stream directly to the pi. This can be achieved with pulseaudio and should work pretty reliably. It has one big disadvantage: every sound will be streamed, including notification tones. I find this to be very annoying and funnily it seems to be a big focal point for Sonos marketing. Anyway, Bluetooth wasn’t the solution for me.
Mopidy is another possibility. It’s a python based media player that supports all sorts of sources; local files, Soundcloud, Spotify and a lot more. It sports a host of plugins and UI possibilities. However, even with a great web UI like Spotmop/Iris, it still isn’t as user friendly as Spotify.
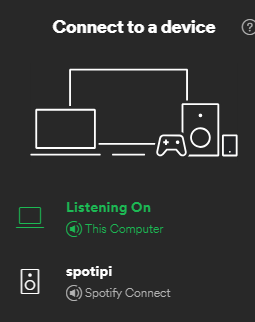
Finally I ran into raspotify. It uses librespot to implement Spotify Connect functionality. Basically Spotify scans the network for compatible devices and lists these in the client. A device can be selected in the bottom right corner of the spotify application. 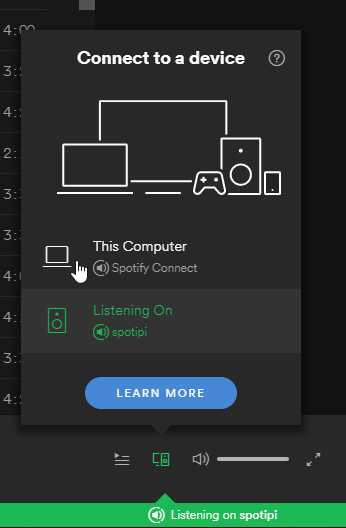
Raspotify doesn’t have to be linked to a specific account: it can be used by any Spotify Premium user on the (WiFi) network. However, a username and password can be entered in the configuration, the connect client can then also be selected when not connected to the same network.
The best thing about this is that the music is truly played by the pi, if the Spotify client on your laptop or phone is closed it will continue to play. This also means it can be controlled by all devices linked to the spotify account playing, for instance: start by selecting a song on your laptop, close it and skip songs on your phone.
Requirements
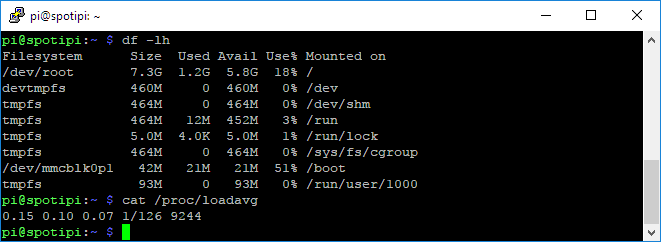
Requirements are very basic, I’m using a Pi 3, but this is probably already overkill. System load is very low when playing songs, so I guess a Pi zero will not be an issue either. The integrated WiFi of the pi 3 is definitely a plus, and more than fast enough for audio streaming.
The required storage space is low too: Raspbian lite and raspotify take up 1.2GB, a 2GB micro-sd card wil do.
One thing to keep in mind is that the analog output of the Pi sucks, either use a digital output (Built in S/PDIF or HDMI output) or get an USB sound card. I’m using a Creative X-Fi Go Pro USB, simply because it was what I had on hand. There are plenty of cheaper options, for instance this one by adafruit. Another option is to use a HiFiBerry Shield, but this is a bit more expensive ($20-$35 depending on the version), though the Specs do look quite good.
Summarized, my setup:
- Raspberry Pi 3 Model B
- 8GB Micro-SD Card
- Creative Sound Blaster X-Fi Go
- Adafruit blue case and lid
How-To
Raspbian Setup
To get started, all the standard tricks for setting up a new Raspbian install:
- Download the latest version of raspbian lite.
- Use etcher and this guide to copy the image to the SD card.
- Create an empty file called ssh on the root directory SD card to enable the SSH client
- Configure your wlan settings by creating a wpa_supplicant.conf file on the root directory of the SD card. Adjust the parameters country, ssid and psk:
country=US
ctrl_interface=DIR=/var/run/wpa_supplicant GROUP=netdev
update_config=1

network={
    ssid="NETWORK-NAME"
    psk="NETWORK-PASSWORD"
}
- Plug the SD card in the PI and power it on, the steps above have preconfigured the network settings and it is now accessible using ssh.
- Connect to the pi by using your favorite ssh client; putty does the work for me.
- Install some requirements, add the raspotify SSH key, add the apt repository and install raspotify:
# Update Raspbian
sudo apt-get update && sudo apt-get upgrade

# Install curl and https apt transport
sudo apt-get -y install curl apt-transport-https

# Add repo and its GPG key
curl -sSL https://dtcooper.github.io/raspotify/key.asc | sudo apt-key add -v -
echo 'deb https://dtcooper.github.io/raspotify raspotify main' | sudo tee /etc/apt/sources.list.d/raspotify.list

# Install package
sudo apt-get update
sudo apt-get -y install raspotify
Configuration
Now configure raspotify by editing the daemon’s config file. I like to change the name to spotipi (as this just sounds way better!) and increase the bitrate to 320kbps. Other options can be found here.
# /etc/default/raspotify -- Arguments for librespot

# Device name on Spotify Connect
DEVICE_NAME="spotipi"

# Bitrate, one of 96 (low quality), 160 (default quality), or 320 (high quality)
BITRATE="320"
raspotify should now be running, check it’s status by typing systemctl status raspotify
Setting the USB-Sound card as Default
If you’re using an USB sound card, the next step is to configure alsa to use it as the default. Raspbian adds an index of -2 to the snd-usb-audio module. This results in the integrated audio to be chosen over any other card. This can be resolved by manually configuring the usb card as the default output, however there’s an easier solution: Comment the line setting the index.
...
#options snd-usb-audio index=-2
...
With the introduction of Raspbian Buster, the bcm2835_audio module needs to be blacklisted as well.
blacklist snd_bcm2835
Reboot the Pi for the modules to reload.
“Setting Up” Spotify
No additional configuration is required on the spotify clients. Simply open the desktop application and look for the devices icon on the bottom right corner. Click it and select the spotipi.
The mobile app will show “Devices Available” on the bottom of the playback screen.